Showing posts with label Nail Polish Post. Show all posts

Monday, August 19, 2013

Konad M95 Review

Hi everyone!
Hope you all had a great weekend!
If you know me, you know I love stamping, and when talking about nails, it is not out of the question. Such fun, and intricate designs can be attainable by just doing a little stamping on your nails. It's quick, and much easier than you might imagine.
I always love experimenting with my nails, so when I saw this plate, I knew I had to try it. Can you guess why? Well, of course, it has an owl on it!!!
So this is what the new Konad M95 Plate looks like: 
 I love the fact that the full nail designs are much bigger than the older Konad plates I own. I've paired the new plate with one of my old ones (Konad M51), so you can see the difference in the size of the design. I was super happy to see the bigger size on the new plate, because that means I won't have to worry when stamping, about the design not covering my entire nail. That is a BIG relief, because you don't want to know how many times I messed up a manicure because the design was too small for my nail. With this new plate, that is a problem of the past. Yay!
I started playing around with the designs and here are some of the shots I took.
For this first picture I used L'oreal's Haute Couture Red, and for the stamping Essie's Good as Gold. I have discovered that I don't always need to use special polish to stamp my nails. Metallic polishes seem to work really well too.
On this next picture I'm wearing Essie's Naughty Nautical which I stamped over with Konad's White special polish.
At this point I couldn't stop playing, so to that, I added Essie's Penny Talk for the design of the other nails.
 Here's a closer look to that other design on the plate using Penny Talk by Essie.
In this next one I used Essie's East Hampton Cottage, and Sally hansen Instadri in Pronto Purple.
I will continue trying the rest of the designs, and I'm very happy with the nail plate. If you are not an accurate nail stamper like me, these designs are perfect because you can get away with not having to stamp perfectly every time, and the designs don't end up looking crooked, or misplaced. Maybe the design with the lace print in the middle might be the most difficult to stamp, considering you might want to keep the design from looking slanted, but pretty much all the designs I tried were pretty fool proof.
One thing I will say however, is that you need to be careful when wipping your plate before tranfering the design to your stamping tool.  You don't want to remove a lot of the polish from the solid parts of the designs. I found this to be a little bit of an issue with the more solid designs on the plate, specially with the multiple hearts design. I found that I needed to be extra caredul just to get get an even looking stamped image. Overall, I think this is a super fun plate, with great designs. The possibilities with it are endless. I could layer that owl anywhere I tell ya'!
I have a tip for you too! My friends over at NailPolishCanada.com are holding a Nail Art Giveaway! The prize is for all 5 of the new Konad plates that have recently been released, and guess what? (Free shipping IS INCLUDED!
If you are interested in entering for a chance to win you can enter here: http://www.nailpolishcanada.com/categories/konad-nail-art.html
Thanks so much for stopping by the blog today, I hope you enjoyed my nail stamping post for today, and I encourage you to try some nail stamping. It's so fun!

Wednesday, May 1, 2013

Stamping...on my nails!!!

Hey everyone!
I wanted to share today a little stamping project I did. This time I stamped on my nails instead of on paper, and I loved the way it came out. I've done this several times before, and I think I'm finally getting the hang of it.
For this manicure, I used Essie's Borrowed & Blue (purchased at The Polish Boutique) as the base color, and Essie's Blue Rhapsody for the stamping. Yes, you don't necessarily need to use special polish for the stamping. I find that metallic polishes work very well for stamping on your nails, so if you have a variety of those, you don't need to go and spend money on more expensive special stamping polishes, if you want to try this. There are a variety of different companies who make the stamping plates you use to create your designs on your nails, and prices for those vary.
The plate I used is a Cheeky one (#CH06) from their Vibrant Collection. Love the flower pattern. Here's what my finished, manicure looked like right after I cleaned off the edges with pure acetone (hence the dry skin around the nails), but I seem to hate waiting for the nails to dry, and apply lotion before taking the pictures I share. Why? I have no clue. Patience is a virtue, and one that escapes me from time to time lol.
Remember to follow me on my Instagram account, which is mainly where I post my manicures. Most that I do, don't get posted here, since I paint my nails so often, and this is mainly a scrapbooking/card-making/crafting blog, so if you don't want to miss any of my polish pics, just follow me there. I actually posted a picture of the manicure before the stamping there, to share the beautiful Borrowed & Blue color, which by the way is my new favorite!
I hope you enjoyed today's nail post, and give nail stamping a try. It's not as hard as it looks! Thanks for stopping by today!

Wednesday, March 27, 2013

Fun Easter themed/Spring Manicure

Hello everyone!
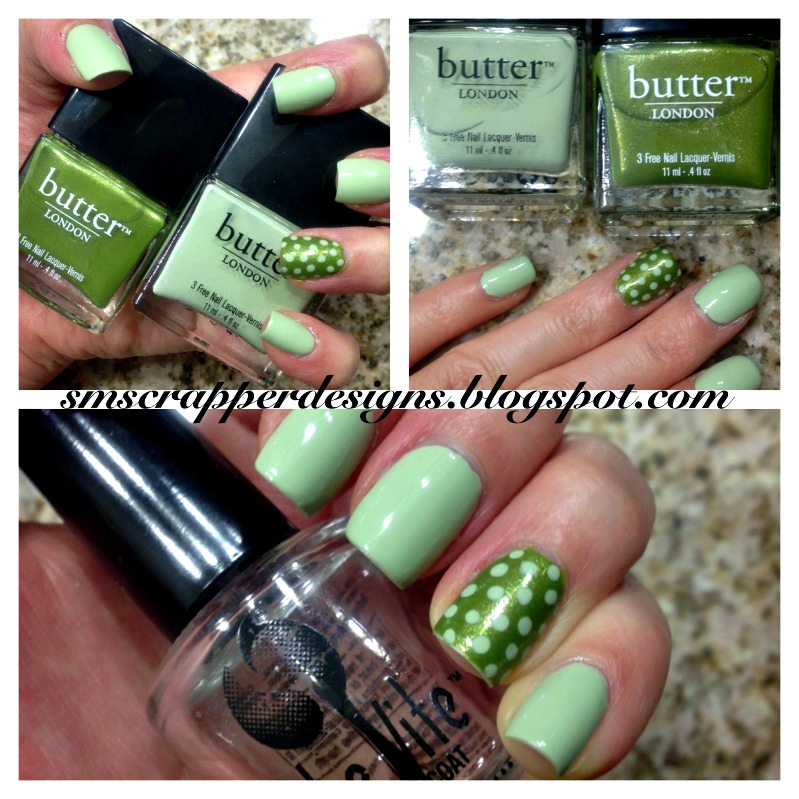
Last night I was in a "green" mood, and decided to paint my ails like this using two of my new Butter London Polishes. Second pastel look of the season (if you follow me on my Instagram you might have seen my first pastel look which I posted there a few days ago), and I'm pretty happy with the simple, yet fun accent nail on this one. I used Butter London's Bossy Boots, which is the minty pastel color, and Dosh, which is the more lime green glittery color on my accent nail. Simple, fun, and playful, just in time for Easter. I used a dotting tool for the polka dots.
I can't guarantee I'll keep this polish look until Sunday, when Easter actually is, (I seem to be wanting to change polish color almost everyday these days), but if I do change it, you are sure to see it first on my Instagram account, so make sure you follow me there if you are interested in seeing that, and more.
Hope you have fun with your Easter themed nails this week:)


Thursday, March 14, 2013

For the love of polish #1

Hello Everyone!
Today, I have a totally different post than I usually do. Today I have a nail polish design post!
Yes, just like with paper crafting, I also have a love of playing with my nails and nail-polish. I have started sharing in the past few weeks on my Instagram account, most times I change my nail-polish, and just yesterday thought it would be fun to share what I do from time to time, on here as well. I hope you all enjoy.
This particular nail design was inspired by something I saw in New York's Mercedes Benz Fashion Week this year. I made it my own, made a few changes, and I love how it came out. It's my first time trying something like this (the straight lines floating on the main polish color), and the way I decided to go about it was quite time consuming , but for the first try, I think it turned out quite well. It's not quite as perfect as I'd like it, but it does the job. Ha!
I don't know about you, but I'm addicted to nail polish. I've been doing my nails ever since High School, and after taking a LONG hiatus from doing my nails after getting pregnant (almost dying), and having my baby girl, I'm getting back to being excited about having my nails done most of the time.
I hope you enjoy these types of posts here and there, and for more snippets of my everyday, be sure to follow me on Instagram HERE. It's set to private, but ask to follow me and I'll give you access :)
Thanks so much for stopping by. All the information about the polish colors I used are in the picture. Have a great day!
Related Posts Plugin for WordPress, Blogger...