Showing posts with label Accucut. Show all posts

Monday, October 29, 2012

A Shabby Album

It's been a long time coming, and I finally got the chance to upload the pictures of this project to share with you! I worked on and off on this album for quite a while, and even though it's a simple album, for some reason it took me forever to get motivated to finish it.
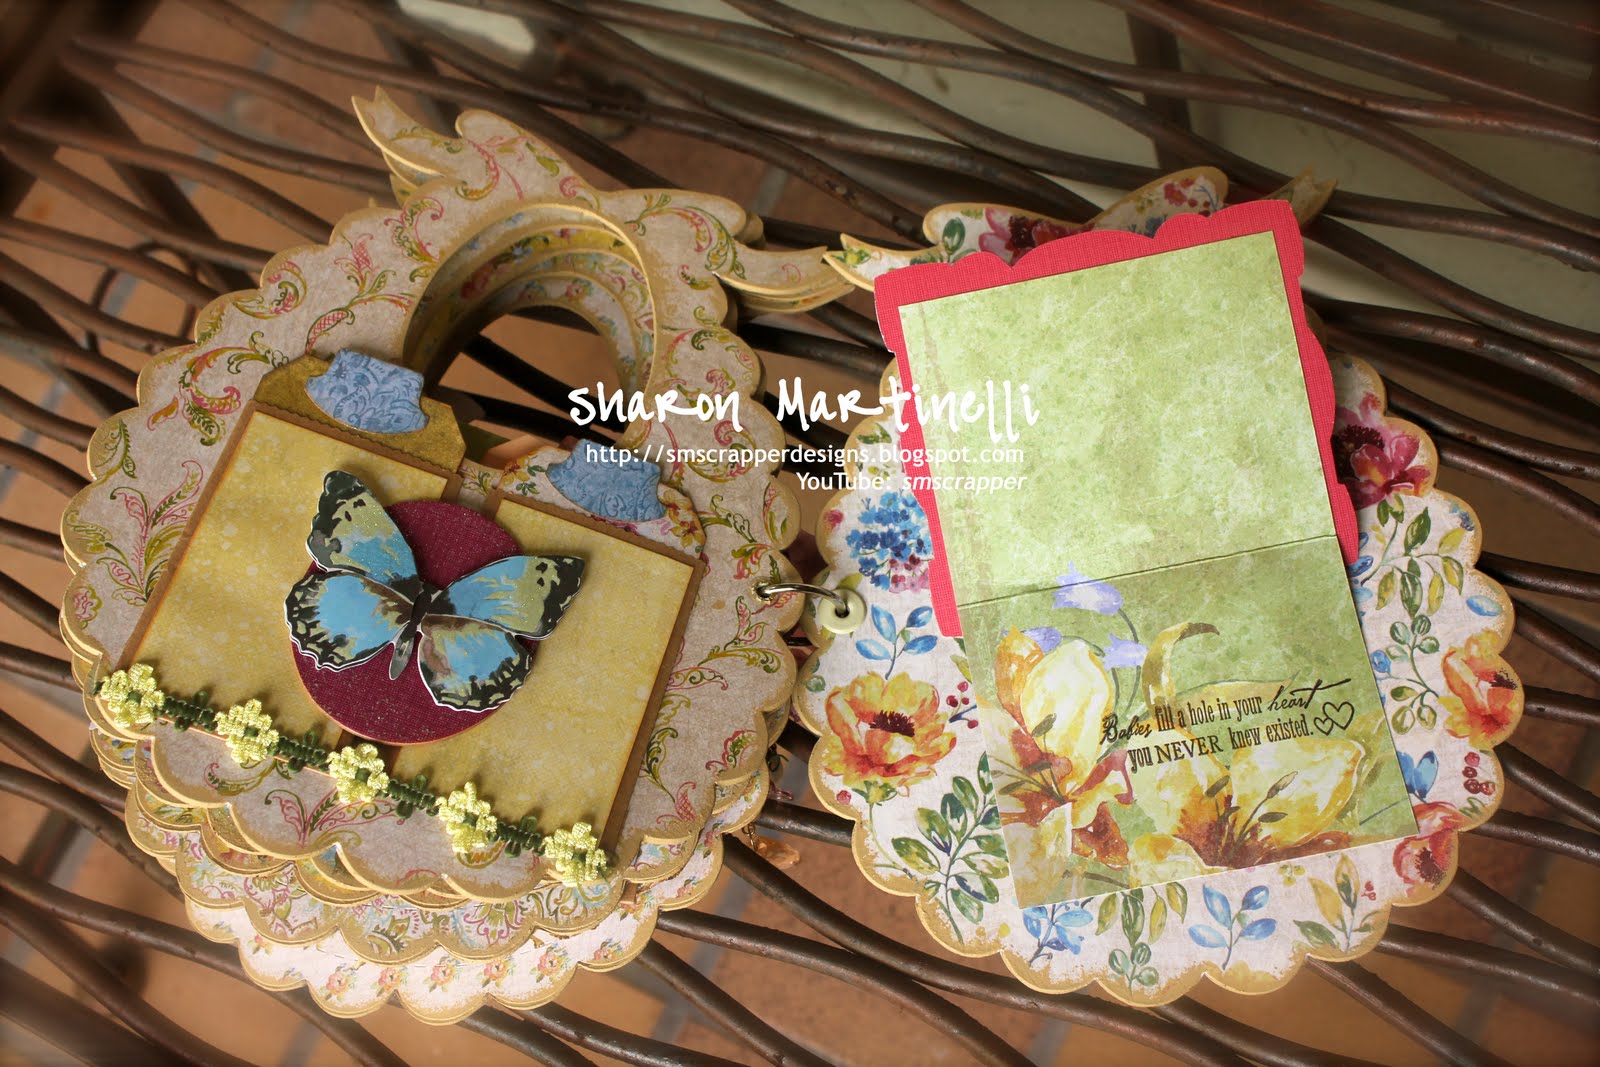
I used the Portrait Accucut Die for the base of the album, which is chipboard, and which I cut in half to make the portrait shape into actual pages for the album. Since I'm on a "paper diet" (which I broke a few days ago, but I'm currently back on it lol), I told myself I needed to start using all the gorgeous designer paper that I keep piling up. What I'm about to say is kind of silly, but honestly, some collections I just have a hard time cutting into lol. For instance, I've been wanting to do some stuff with Graphic45's last year's springs collection, yet every time I think I might sit down and start the project, I put everything away because everything is so beautiful I don't want to cut it lol! Isn't that just CRAZY?! Seems pretty crazy to me, but little by little I'm pushing myself to use all my gorgeous paper lol. One that's particularly hard to get into, is my all time favorite Lost and Found by My Mind's Eye, the Sunshine Collection. Ugh! I LOVE that entire line, but that particular collection just drove me crazy and I bought everything of it, both the 6 by 6 and 12 by 12 papers too. I have stuff in mind for them...now it's only a matter of cutting them up and starting already lol.

Anyways, back to this album. I used one of my hoarded collections by The Girls Paperie. So sad they closed down, because their designs were pretty neat. I also used some of my leftover paper from K & Co.'s Watercolor Bouquet Collection, because some of the colors went well with The Girls Paperie stuff. I made a detailed video of this project which you can watch at the end of this post if you are interested in seeing all the details, but here are a few pictures so you can get a glimpse of some of what can be found inside.


Here's the video for you:
The goal with this album was to have a place to hold a bunch of pictures of my Emily's second year of life. I can't believe how fast time flies, and sure enough she'll be turning three pretty soon! I hope you enjoyed this project, and stay tuned, because I'm determined to get into my paper stash, and I think The Sunshine Collection by My Minds Eye is my next target!
Hope you are having a good week, and if your town is on Hurricaine Sandy's Path, know that you are in my prayers. It wasn't even a direct hit in my area, and still the beaches around here have been completely wiped out... stores are closed, and the storm's consequences aren't done yet with this area. I can't imagine everyone that's getting directly hit with that awful storm. Be safe and take care!

Thursday, December 22, 2011

One more Christmas mini!

I don't know about you, but I can't wait until Christmas day is gone and done with. Not because I don't like it, but because I am SO stressed out about it! Grrrrr it's been a stressful couple of weeks I tell ya!
However, a lot of progress has occurred since my last post, and my whole house is decorated, all the presents I have bought are wrapped, and all my Christmas cards have been mailed out, yay!
I'm hosting a dinner party this Friday and I'm cleaning, organizing, and gathering my cooking supplies like a crazy person....Still have two more gifts to purchase, which I hope to get to today, and wrap asap. Oh what fun, huh? LOL
I'm sharing with you today a Christmas Mini Album I created using the December Paper Niche Design kit.
On the cover, I did a background technique which you can look into by watching the video of the mini by clicking HERE. I used my Lindy's Stamp Gang Sprays and went to town on Tim Holtz's Tissue Wrap. 

These are the first two pages of the book. I cut the book out with an Accucut die (Lunchbox #1 Dividers) on medium weight chipboard.
On the next two pages there is more space for pictures and journaling, and  I used my Lindy's sprays on the flower you see on the top right. Love how the light reflects all the shimmer of it.
 The next two pages...
 Here's how the [ages look once these tags are taken out of their pockets.
Finally, these are the last two pages of the book which complete the album.
There are more details on all the pockets, and tags in the album video, so if you'd like to take a closer look, don't forget to click HERE to watch.
Just in case I don't get a chance to come back before Christmas, I want to wish each and every one of you wonderful readers, and followers a wonderful and very Merry Christmas!

Saturday, October 29, 2011

Create Banner

Today I wanted to share a banner I made with the Paper Niche's October Kit. It's the second banner I ever make and I loved how it turned out. Simply a nice piece to put in my craft room. Right now it is at the store, and it looks great there too :)
I used an one of the Accucut Banner dies to make it, with both medium weight, and light weight chipboard. I used my Lindy's Stamp Gang Sprays on the rosettes ( I used a mixture of two sprays: Tainted Love Teal and My Mojito Green),  which I made with my Tim Holtz rosette die, as well as on the corrugated chipboard letters from the kit ( I used a mixture of Pretty in Pink Pink and Rhodeonderon Rose Red for those), which I love!

I distressed all the edges with Walnut Stain Distress Ink and added some bling for more interest. The hanging charms were made with the Kaiser Craft canvas tags included on the kit. I added some Making Memories Charms, also from the kit, as well as a swivel clasp, and some metal Tim Holtz charms from my stash. I sprayed the background of each panel with another of my ALL time favorites (I need a gallon of it at home I tell you) Glitz Spritz in Cactus Gold! Love that stuff!!!
It was a really fun project to create, and I can't wait until I hang it on my new organized scraproom (once I'm done organizing it of course! LOL).
Now, for the many of you that have been curious (I've been getting private messages and emails like crazy asking me about it!), I am currently working on editing my giveaway winners video.  It has taken me a while to go through all the videos and comments...I'll be uploading the video in a bit.
Hope everyone is having a great weekend. It seems that I'm finally on the mend from this awful flu I caught! Yay! Thanks for stopping by!

Sunday, July 10, 2011

Baby Bib Mini Album

I finally completed my Baby Bib album! Can you believe it? It took me long enough, right? LOL I'll give you the warning that this is a very picture loaded post. I hope you enjoy the close look at the mini album.
This is a chipboard mini album, made with Accucut's Baby Bib die. I love the shape and all the real estate in this album. I put in a lot of pictures and lots of places for journaling, and there is still a lot more space for more, if in the future I decided to add more to it.
I used the Watercolor Bouquet collection from K & Company, and I loved using most the of the embellishments that came with the collection. On the cover I used a Sizzix Frame die cut, which I glittered up using some of my Crystal Stickles to match some of the 3D stickers of the collection. I used some Iamroses and Recollections flowers, as well as Prima Pearls and Studio24 bling. Love all the dimension on the cover.
For the binding I used a one inch binding ring, some pink seam binding, and a charm that matched the colors of the collection. I made the charm using some fishing gear which I alcohol inked, and pieces of a Christmas ornament I bought a few years ago on clearance at Michael's. After having it for several years, it finally made it to a project (well, some parts of it anyway LOL).
I really liked all the different textures I managed to put into the cover. It's definitely 3D.
This is how the book looks from the side while standing up. It's a chunky mini, and I love that I can display it standing up.
When you open the first page this is what you see. This mini album (which now that I think about it, is not so mini ---it's about 10 inches by 8 inches), has a lot of interactive pages. I tried to capture this in the pictures, but for a better look at how all the pages and pockets work, please watch the entire video of all the details by clicking HERE.

When you flip to the next page this is what you see...
This is the next set of pages...
And the next set...
Ans this is how the pocket on the right page works:
As you can see, lots of room for journaling and pictures...

These are the final two pages...
Here's how the page on the right works...
And again, another secret place for more journaling...
This is the back of the album, with just my information stamp on the back.
Hope you enjoyed this mini. Remember to follow my blog by clicking on the "FOLLOW" button at the top right of the screen...I'll also be doing a giveaway once I hit 2000 subscribers on my YouTube Channel, so subscribe to it HERE and don't miss out on all the fun!

Thanks so much for stopping by, and remember, I truly appreciate you and all your comments. Until next time!
Related Posts Plugin for WordPress, Blogger...