Tuesday, June 28, 2011

Are you ready for this?

Hi everyone!
I'm so excited to share with you some super news from Lindy's Stamp Gang. First off, a new color set coming out on July!  It's the Summer of '89 Set and the colors are so yummy. Take a look:

I've already started a project with these babies and will have it posted right here on the day of the release (July 1st), so make sure you come back and take a look! So much shimmer, so much color, you will totally love this set.
The other thing I wanted to share is this: check out the Starburt's new labels!
Don't the bottles look fabulous? I want to thank the lovely Yvonne for the great picture of these beauties. Such pretty shiny labels that will make picking the colors from your stash so much quicker, because now you'll be able to see which bottle color you are picking up by just looking at the bottle's label. Clever move, huh?  I know it will definitely save me time when picking colors for my projects. Hope you enjoy them as much as we do.
Have a great rest of the week!

Thursday, June 16, 2011

Ah, life!

Hi everyone!
I've been missing in action because life has gotten busier and also because I've been really sick. I caught the nastiest cold ever, and I'm still trying to recover LOL. My little Emily was sick as well (she actually was the one who got me sick), but she's all better, running around and climbing on everything. She is a lot of work, but I just LOVE her SO MUCH!!!
                            
I wanted to say thank you to all my followers. I have been so blessed with so many of you and I wanted to say, I really appreciate you all.
I'm getting ready to finish and post a project real soon, which I'm really excited to share. It's a mini album that will be very special... I have a lot of ideas in my head as well for new projects, so as soon as I get my strength back, and this house back to normal (oh how messy things get when you're sick! LOL) I'll start working and posting them for you. Praying for some mojo to come back into my life!

I'll start catching up with all my YouTube Videos too, so if you follow me there as well, stay tuned for the videos coming up.
Thanks so much for stopping by, and always remember, I appreciate each and every one of you!

Thursday, June 2, 2011

More of Intaglio and Exciting News!

What can I say? I'm hooked on the technique. The look you get with it is so fab, I just can't get enough of it! I decided to make a tag because I hadn't made one in a while and this was the result.
I used another stamp I had not used before (let me tell you I'm having so much fun using what I have and not going crazy buying stuff!), and two toned embossing powder from Lindy's Stamp Gang. I just love all the glow and shimmer their embossing powders provide. Have you tried them? They are super cool. The color I used was the Ceasar's Gold, and I just love the texture it gave to my card. I used the Tim Coffey's Cottage Garden Designer paper, which I'm also hooked on, as well as the Glitz Spritz in the color Desert Moon Gecko Green.....I don't know what is is, but I keep telling you it's my all time favorite and I have to spray it on everything! See the turquoise shimmer everywhere? I have to stop using it so much though, because as you know, it has been discontinued, and once my bottle is over, I won't be able to get it anymore :(.... (oh but regarding this, I have exciting news! Keep on reading until the end of this post to find out haha!)
To hold my sentiment (which was stamped from an American Craft's stamp set called Enjoy), I used an ornament hook I purchased at Target. I love the distressed look it has, and most of all how inexpensive it was, being that I bought some packs on clearance after Christmas at 70% off. Score!

I've been using lots of punches in my projects lately, and I incorporated some of the leaf punches I own. I used a Prima flower and trim, some K and Company brads, a brass charm from my stash, an extra large copper eyelet, and some gold sprays and fibers.
If you'd like to watch the technique step by step with this particular stamp, you can click HERE for the video.

Now for the EXCITING news!!!
I know a few of the Glitz Spritz at the LSG site were discontinued, along with my beloved Desert Moon Gecko Green, but have you heard there are four new sets of colors being released??? Yes, four!!!! Oh I am so excited about that! I have them all in my possession already and I know you'll LOVE them. All the sets have awesome colors, and great names too! The first set being released will come out this Friday, June 13 and it's the Drink Me Silly set. Look at all the fantastic colors! This is definitely my favorite set at the moment.
Check out the Lindy's Stamp Gang Website on Friday to get this awesome set at a great introductory price. Once you get them you'l love them! 
Thanks for stopping by!

Monday, May 30, 2011

IAMROSES "In the Garden" Creative Contest

Happy Memorial Day everyone! 
Today I wanted to share with you my entry for the IAMROSES "In the Garden" Creative Contest. I did something I've never done before, and I'm happy how the finished project came out. I let my imagination and creativity lead the way (after all, it's a "creative" contest LOL). I wanted to make something different, something fun, garden related.... so......... I altered a garden pick, using IAMROSES and Lindy's Stamp Gang products!


I I I For the details on the project and all the products used, please watch the video HERE.
Thanks so much for stopping by!

Saturday, May 21, 2011

Under the Sea Canvas Project

Today I wanted to share with you my first canvas project. I've been wanting to alter one for a while, and when I had the opportunity,  I bought a few of them on sale at Michael's and Big Lots. I had some cute pictures of my daughter at the beach, and I thought it would be great to integrate at least one of them in my project for Lindy's Stamp Gang's Under the Sea Contest. Some of the design members made some inspiration projects for the people who want to participate in the contest, and here is mine.

I had a great time creating this piece, and it came out just like I had envisioned in my head. I used a ton of Lindy's Stamp Gang products on it, and I love all the shimmer that radiates from all over the canvas.

I used embossing powders to give the wooden starfish the look you see. The colors I used were the Cleopatra Copper and the Kaiser Rudolf Russet. I love mixing together in one piece the Lindy's Stamp Gang embossing powders because the micas in them make them so unique. Before I embossed the starfish, I did use the Moon Shadow Mist in Incandescent Copper, just to make sure all the edges of the wood were covered in dark color, just in case my embossing did not reach certain areas of the wood. You can never be too careful, right? I embossed the seahorse as well, and the tone and dimension the embossing powder gave to it is just so nice. For that I also used two different embossing powders: Byzanine Bronze and King Midas Gold.

Directly on the design paper I used different Starburst Stains in the colors Frosted Forget Me Nots, Delphinium Turquoise and Bachelor Button Blue. The shimmer they all give off is truly amazing, and you can see in the pictures for yourself...


Can you  see all the shimmer, both in the front and the back of all the designer paper!!!!! This was one sided designer paper from K and Company---the Winter Wonderland Paper Pack. Who would have thought, right?
I painted the whole base of the canvas with my Ranger Dabber Acrylic Paint in the color Sandal, and on top I brush a Starburst Stain in the color Golden Sleigh Bells. The sea shells you see on the edge where embossed with Byzantine Bronze embossing powder from Lindy's Stamp Gang, using a stamp set from Hero Arts...

You can watch a video I made with all the details of both, the contest and this project by clicking HERE.
I'm really happy with the final result. I mean, for my first canvas, I think I did ok. What so you think?
Where you inspired?

Lindy's Stamp Gang "Under the Sea Creative Contest" Info
• Theme: “Under the Sea”
• Contest will run May 21, 2011 through June 8, 2011 
• This particular contest is a YouTube only event. 
 Entry requirements: 
1.) Use Lindy Stamp Gang product(s) 
2.) project must follow the theme "Under the Sea." 

From there, you can create anything from a card, tag, mini album, altered canvas or box, etc!
Post a video of your project submission to your personal channel with title: Lindy's Stamp Gang “Under the Sea” Contest; Submit a video response to LSG Contest Video to enter; Multiple submissions per person are allowed, but you must do a video response for each submission.
• Winners will be announced on the LSG Channel on June 9, 2011. 
The TOP 5 winners will receive a "Pirate's Bootie" of goodies from LSG. We are looking for creativity and the most inspiring use of colors in your projects!

In addition, during the contest (May 21 to June 8) Lindy Stamp Gang will donate 5% of each sale on the Lindy Stamp Gang website to the American Cancer Society. How awesome is that?! 
Random prizes will also be given out during the contest, and participants could win little goodies along the way! So don't miss out on the fun!
Watch the official contest video HERE
Thanks for stopping by and hope you were inspired!

Thursday, May 19, 2011

Stamp Camp 2011

This is totally an over due post. I have completely forgotten to show you all the things I was able to make during Stamp Camp this year...It's been a while since I attended (February 2011), but I just had not taken the time to get this posted...oops!

Anyways, for those of you who don't know what Stamp Camp is, it is just a yearly event hosted by many  of the Stampin' up demonstrators in my area. It's a whole day of crafting using Stamping up products. This was my second year attending and it was a nice experience, and to top it off, I actually won some fabulous product! To hear and see the details of my day, watch a video I made HERE.
Here are some pictures of the projects I created that day. Simple, but really pretty!


Monday, May 9, 2011

Mother in Law Mini Album

After making my mom a mini featuring my daughter's first year of life, I decided I needed to make one for my mother in law as well. It is the same concept as my mother's mini---elaborate cover but simple inside, however, I made the cover completely different even though I used the Alpha Chips from Tattered Angels once again (to see the other mini I'm referring to, check the blog post on May 2, 2011).
 I used different flowers and leaves, as well as a ton of Lindy's Stamp Gang products. For the biggest curly roses I used Startburst Stains in the colors Sea Mint Green and Glory of the Seas Gold, as well as the Moon Shadow Mist in the Gossamer Gold, and my favorite Glitz Spritz (which is being retired and is on sale on the Lindy's Stamp Gang website right now) in the color Desert Moon Gecko Green. I sprayed the cover with the Moon Shadow Mist in Gossamer Gold, and for the Tattered Angels Alpha Chips I used the Desert Moon Gecko Green Glitz Spritz as well as the Starburst Stain in the color Baby Blue Eyes Aqua, together with my Walnut Stain Distress ink and got that vintage shimmery aqua look. I sprayed the green leaves with a Moon Shadow Mist in the color Landlubber Green, and it made them so shimmery!

 I chose to use the same binding as before, and dyed some seam binding with a Startburst Stain in the color Cocoa Bean Copper. I just love how the bows look as the binding, so I had to do it again.
 I also included some metal leaf accents which I stained using Gold and Copper Alcohol ink. I love the different texture it adds to the cover. The ones I used have been in my stash for over a year now, but you can find similar ones at the Lindy's Stamp Gang website. They carry a variety of brass charms which you can customize to match your project. To finish it off I added some Recollection flowers, skeleton leaves, and Prima pearl swirls which I colored with my Copic Markers to make them match the project.
For a more detailed view of the album, you can check out the video I made for it by clicking HERE.
Thanks so much for stopping by, and I hope you enjoyed your weekend!

Friday, May 6, 2011

Mother's Day Cards

Hi everyone!
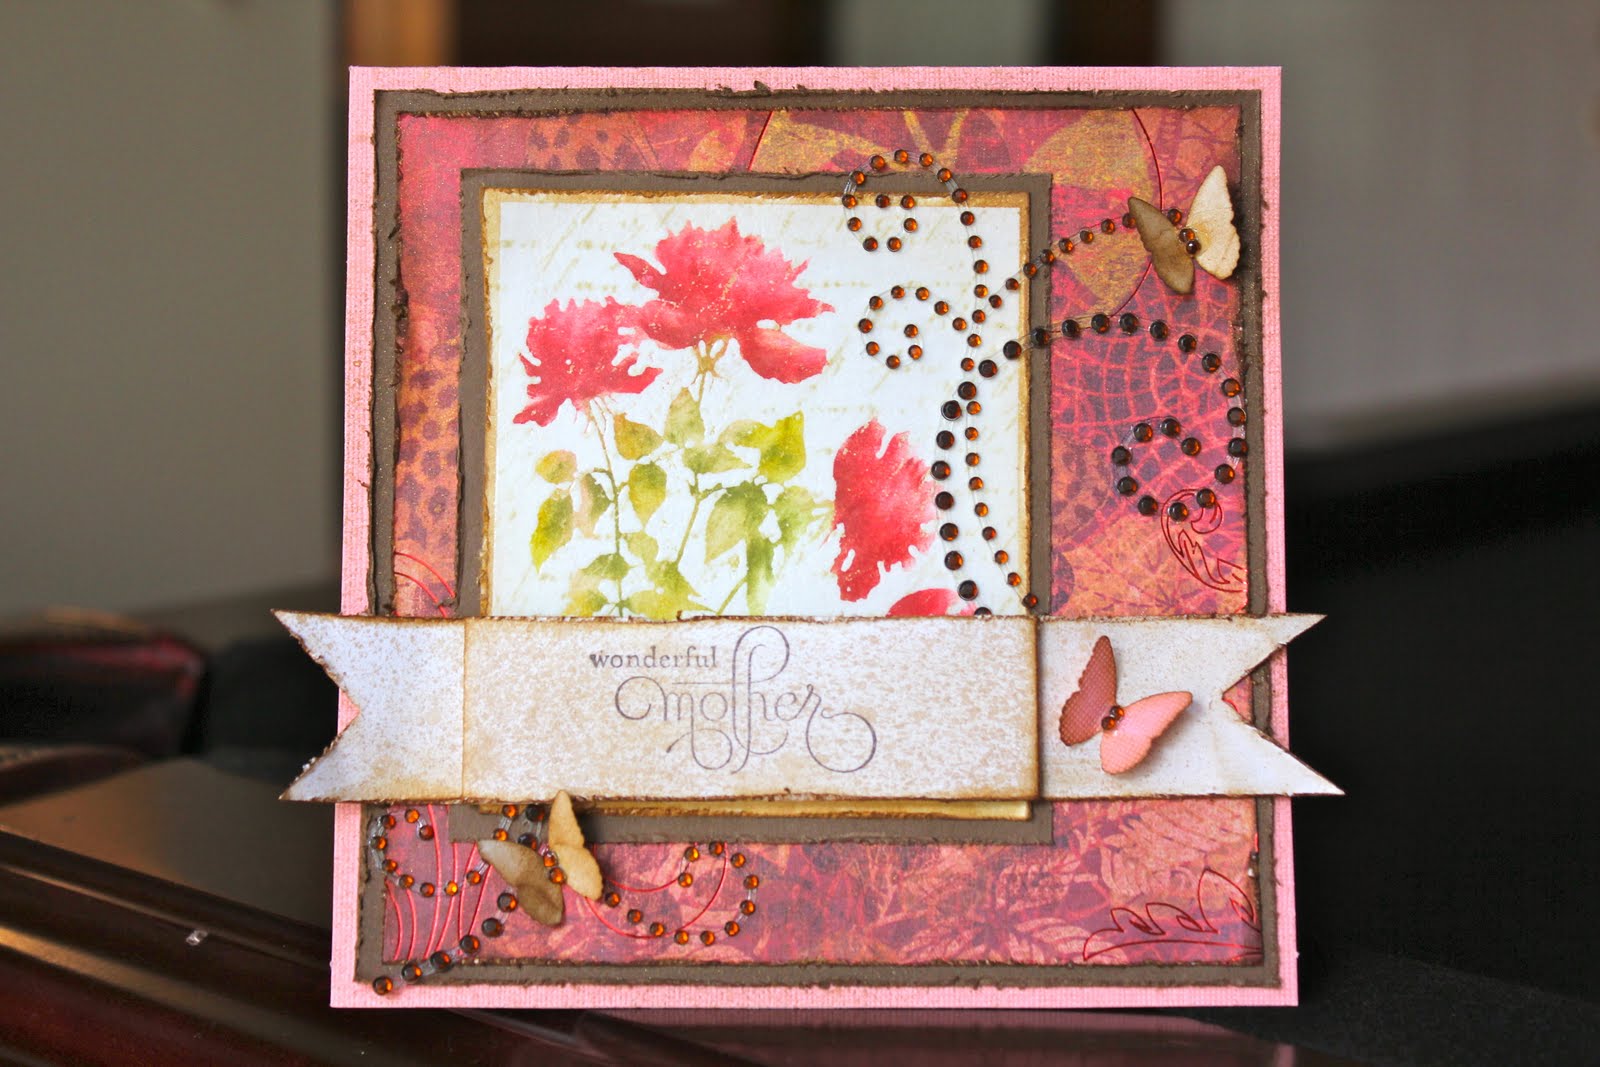
I wanted to share with you two Mother's Day cards I just completed. I was under the impression Mother's Day was still a week away, and I didn't realize that the second Sunday of May was actually this Sunday until just a few days ago, so I had to rush to get these done. I'm also in the middle of a project for my mother in law----- a mini I decided to make her after making my mom one. I probably will have to share that mini either this Saturday, or the Monday after Mother's day because I'm still not done with it. I will have it done by Sunday, but I don't think I'll have time to upload a video or make post about it by then. I do promise I will share once I'm done. For now, here are the cards I finished.

This first one is for my mother in law. I was in the mood of banners I guess, because both cards have banners. I used a Hero Arts Stamp (Silhouette Meadow Flowers) and used the Emboss Resist Technique on the focal image, which I colored in using my Distress inks from Ranger. To watch a video on the technique and how I created that emboss resist piece, please click HERE.

I used a Martha Stewart Punch to punch out the butterflies, some Prima Bling and my Distress Ink in Vintage Photo to distress all the edges (after using on them my Tonic Distressing tool). The designer paper I used was from a RAK I received from my friend Jil.  I don't know the name of the collection, except that it's from a K and Co. paper stack. It's gorgeous.


 I used a Stampin' up Stamp Set for the sentiment (Well Scripted), and I sprayed the banner with my Lindy's Stamp Gang Spray in the color Gossamer Gold. I also sprayed the back of the cards with my favorite Glitz Spritz of all time Desert Moon Gecko Green. As you can well know by now, I spray it on almost everything...can't help it!
This next card I made is for my mother. She likes browns and greens better than the pinks, so this was the perfect color combo for her. I still don't have a technique video for the background piece of this card (had no time to film it), but I plan on making one soon, so stay tuned for that. The texture it gives to the card definitely makes a statement.

I used Lindy's Stamp Gang embossing powder in the color Angel Wings Peacock, and this particular powder shows off  some turquoise shimmer---my favorite.
To watch the video of the details of these cards please click HERE. I hope you enjoyed these cards, and come back later for my finished Mother in Law mini.
Thanks for stopping by, and to all the mothers out there: Happy Mother's Day!

Monday, May 2, 2011

Mother's Day Mini Album For My Mom

My mother lives far away, and she doesn't get to see my daughter as much as she'd like to. We share pictures and videos of my daughter with her all the time, but I though it would be nice if for Mother's Day I would make a little mini for her, featuring my baby's first year of life.

Since my mom doesn't scrapbook, I decided to make the book a very simple one, and focus on the cover.
I put my daughter's initial as well as some flowers to make the cover look pretty. The monogram in the cover is made up by Tattered Angels' Alpha Chips Framed Fonts in Regal, which I colored using my favorite, Distress inks and Lindy's Stamp Gang's Glitz Spritz in the color Desert Moon Gecko Green. Instead of binding rings, this time to bind the book I used seam binding, which I dyed with a Starburst Stain in the color Cocoa Bean Copper. I love the look!
The big flower in the cover is from iamroses.com and the little ones are from Recollections. I sprayed the big flower with a Moon Shadow Mist Spray in the color Gossamer Gold, and distressed later the edges using Walnut Stain Distress Ink from Ranger. I also sprayed the entire page with the Gossamer Gold, and I love all the shimmer it gave to my project. I added some pearls and gold metal trinkets, and a K and Co. button to finish the look, and well as a felt butterfly I found on the Michael's dollar spot.

Most of the work was the cover, and the inside is basically just the pictures I wanted to enclose for her, with a few minor paper embellishments I made with some paper punches.
I hope she enjoys it time and time again, when looking back at these pictures. I'm getting ready to mail it out to her with a few other goodies, just in time for Mother's day.
Thanks so much again for stoping by, and if you'd like to watch a detail video of this entire mini, you can click HERE.
Have a great rest of the week!

Friday, April 29, 2011

Fabulous Ruby!

Today I wanted to share with you this simple, but sweet card I made for my scrappy friend Rina. She is one of the funniest and talented people I follow on YouTube, and a few weeks ago I sent this to her along with some goodies for her to play with. It was a simple card, but I just wanted the fabulous "Ruby" stamp from The Greeting Farm to be the center of attention. It was quite a struggle to color her hair (you know me and my endless problem with brown hair), but in the end I think I made it look pretty decent LOL.
I just love the Spellbinders Label Dies, and I used one of my favorite ones in this card ( Labels Four). I used the Ancestry Collection by K and Company, and I had to put in some brown bling to add a little bit of interest to the corners of the card. All in all I think the paper piecing of the clothes was the right way to go, and it just makes little Ruby the star of the card. I love that stamp!
Thanks for stopping by!
Related Posts Plugin for WordPress, Blogger...